Table of Content
Do you have a Privacy Policy page on your WordPress website? If not, we highly recommend you add it as soon as possible.
This article will cover an explanation of a Privacy Policy, why Privacy Policy is needed, a step-by-step guide to create a Privacy Policy in WordPress website, and a process to add a link to a Privacy Policy page on a footer of your WordPress website.
Ready? Let’s get started!
1) What is a Privacy Policy?
It is a legal document that outlines who you are, what personal data you collect and store on your website, how you utilize the information provided by the users while browsing your website, and more.
2) Why Do You Need Privacy Policy Page?
According to the privacy law around the world, if you collect any personal information from your website visitors, you need to have a Privacy Policy posted clearly on your website.
3) Create a Privacy Policy in WordPres

Let us go to our WordPress dashboard and click on the pages to get started. You will see a sample Privacy Policy page available as a draft. Click on the edit button, and your Privacy Policy page with the sample content is ready.
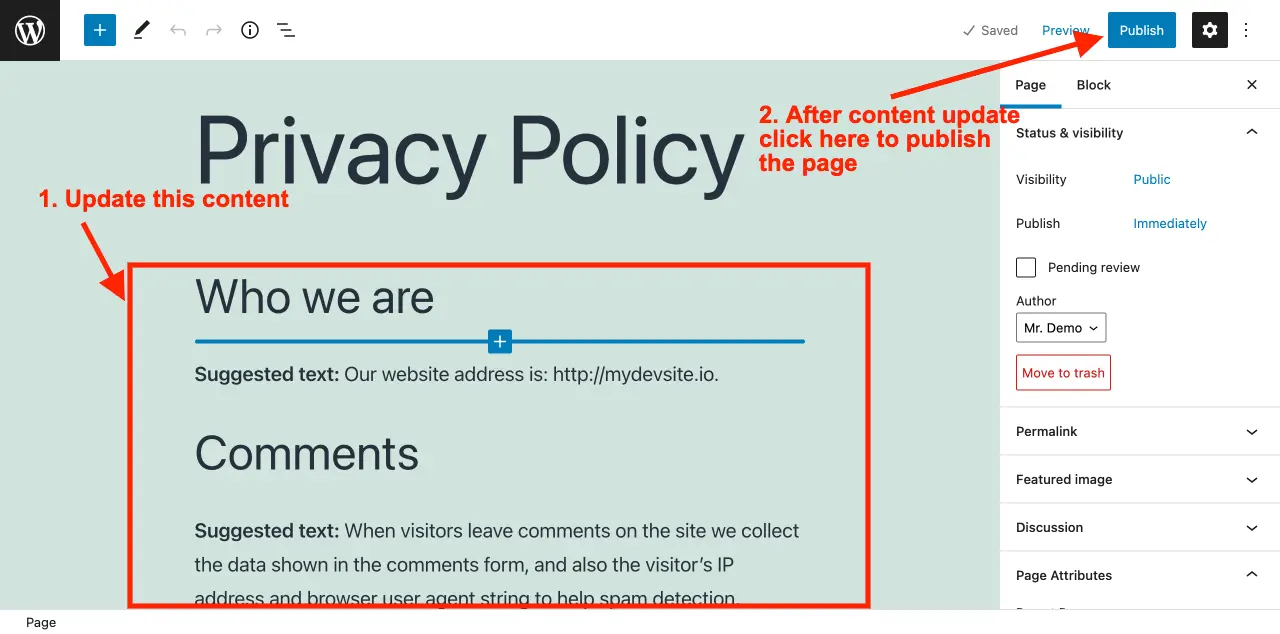
Next, change the content and click on Publish button to publish the page. After you publish the page, you can view it and see the content and layout of your Privacy Policy page.
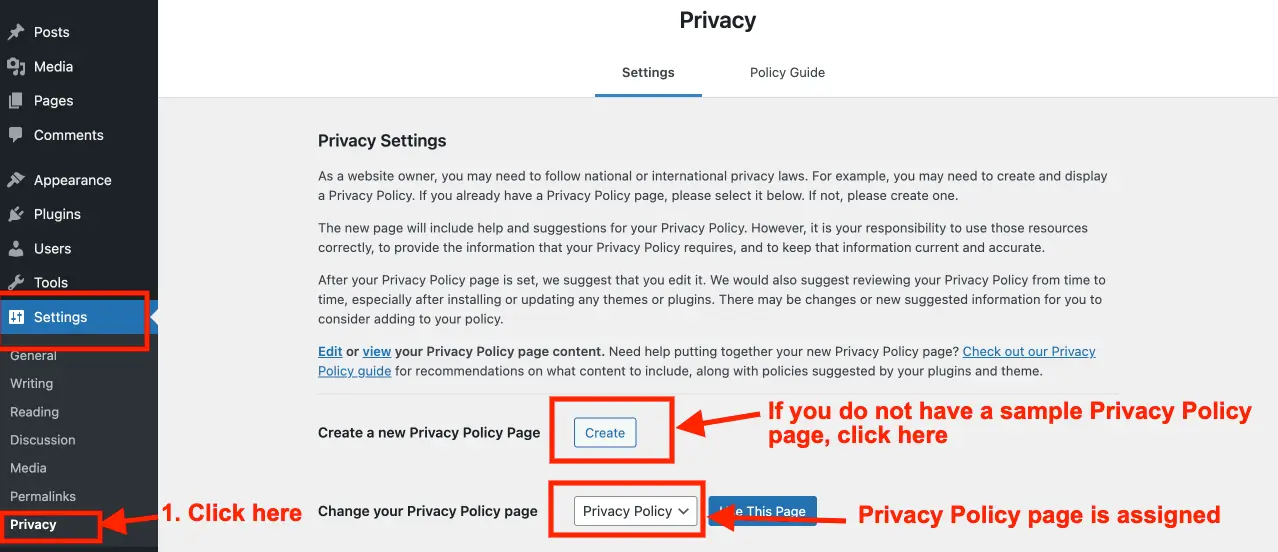
Now go to the dashboard again and click on Settings >> Privacy which you can find on the left navigation of the dashboard. Here you can see a Privacy Policy page has already been assigned to your site. If it has not been assigned, you can select the Privacy Policy page from the dropdown and click on Use This Page button to set the Privacy Policy page.
If you do not have a sample Privacy Policy page as explained above, click on the Create button. You will be redirected to a new Privacy Policy page with sample content. As explained before, you can update the content of this page and publish it.
4) Add a Privacy Policy Link in WordPress

In this article, we will add a Privacy Policy link on the footer of our website. To add the Privacy Policy link on the footer of your website, go to the dashboard and click on Appearance >> Menus
Click on create a new menu, give it a name like Footer Menu as shown above.
Now click on View All as shown on the screenshot and select the Privacy Policy page. Let us add the Terms & Conditions page as well. So select it too. Now, click on Add to Menu and assign it to the Secondary Menu. Finally, Save Menu, and you are done.
Please note that the position of the footer menu depends on the theme you are using. For example, we are using the Twenty Twenty-One WordPress theme for this demo. So if we assign a secondary menu, it goes to the footer of the site.
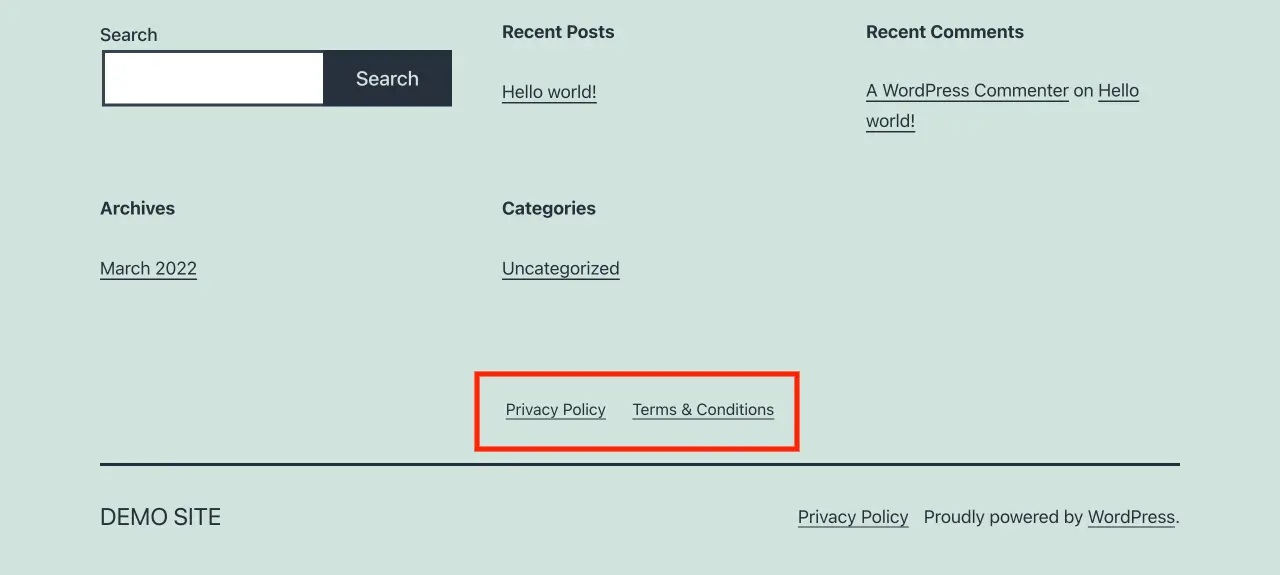
You can go to the frontend of the site and refresh it. You will see the Privacy Policy and Terms & Conditions pages we have recently added to the footer.
5) Conclusion
We hope you will be able to add a Privacy Policy page on your WordPress website. Additionally, it is suggested to display Cookies Consent & Compliance Notice on your website. We are using CookieYes | GDPR Cookie Consent & Compliance Notice (CCPA Ready) plugin for this purpose on our website.
Feel free to comment below if you have any feedback. Also, check out our articles on How to Add Google reCAPTCHA to WordPress Forms and How to create an Off Canvas Menu with Elementor Pro.
Summing up, you can connect with us on Facebook and Twitter. Also, subscribe to our Youtube channel for WordPress videos.